Phone as a Key for Electric Skateboards
January 9th 2019
Demonstration here.
The Problem
I own an electric skateboard made by Boosted, and it is my main form of transportation in Boston. I worry too often that someone might pick it up and make a run with it (they ain't cheap), so I needed some way to curb my anxiety.
Design Considerations
I need something that is:
- Human-focused: minimizing friction for the user. It should be as easy as walking away from the board to arm it.
- Energy efficient: ideally, this should last me several weeks before having to recharge.
- Cheap: #collegestudent.
Proposed Solution
- Inspired by Tesla's keyfob technology, I'll use wireless signals from a phone to determine distance to the board, which will control the system state with no human intervention.
- We'll use off-the-shelf components and focus on minimizing quiescent current draw.
- We'll "borrow" as much hardware as we can from Harvard's maker labs.
Building
MBOM
- Wireless receiver
- WiFi was my initial gut reaction, but the user would not be able to use other WiFi networks while using the product. Out!
- Cellular signals are nice, and we can always measure pings, but confirming a device ping is my device and not another, say, T-Mobile device pinging on the same band would prove problematic.
- Bluetooth seems the way to go. It can be connected to my phone as a peripheral, and should give me a pretty good idea for distance when looking at signal strength. This BLE UART from Adafruit ought'a do it (Fig. 1).
- Movement/SLAM sensor
- An accelerometer is a good way to go. Since I don't have one at the moment, for now I'll go for a tilt ball switch I had laying around (Fig. 2).
- Speaker/alarm
- Cheapest thing I could find was a Piezo buzzer. They're small but loud-- and dirt cheap.
- Microprocessor
- I'll start off with an Arduino Uno for prototyping, but for the final product I'll elect to choose either an Arduino Trinket or a Micro.
Calibration
I need to get the signal strength of the connection between my phone and this receiver. After soldering the header pins, I was able to use a SoftwareSerial connection to request via UART the received signal strength indicator (RSSI) value via command "AT+BLEGETRSSI" from my TX to the receiver's RX.
Signal Processing
First, the motion sensor to sense whether the board is moving:
What, this component isn't interesting enough? Fine-- I'll implement it with as an interrupt service routine. Woo-hoo.
Understanding Piezos
A piezo buzzer works by exciting a ceramic material particular distances at different voltages. You can use pulse-width-modulation to control the frequency to produce different sounds. Here's how I designed the sound system:
- playTone: plays a tone via changing the duty cycle with tone value for duration seconds.
void playTone(int tone, int duration) {
  // Excites buzzer up with tone duty cycle for duration time.
  for (long i = 0; i < duration * 1000L; i += tone * 2) {
    digitalWrite(SPEAKER_PIN, HIGH);
    delayMicroseconds(tone);
    digitalWrite(SPEAKER_PIN, LOW);
    delayMicroseconds(tone);
  }
}
- playNote: maps tones to standard notes a through g to make it easier to play the right notes.
void playNote(char note, int duration) {
  char names[] = { 'c', 'd', 'e', 'f', 'g', 'a', 'b', 'C' };
  int tones[] = { 1915, 1700, 1519, 1432, 1275, 1136, 1014, 956 };

  // play the tone corresponding to the note name
  for (int i = 0; i < 8; i++) {
    if (names[i] == note) {
      playTone(tones[i], duration);
    }
  }
}
- playSound: Simplifies music design, grabbing the notes, tempo, etc. and toggling a quiet variable to ensure two tunes aren't played at the same time.
void playSound(String notes, int beats[], int tempo, int numNotes){
    quiet = false;
    for (int i = 0; i < numNotes; i++) {
        if (notes[i] == ' ') {
            delay(beats[i] * tempo); // rest
        }
        else {
            playNote(notes[i], beats[i] * tempo);
        }

        // pause between notes
        delay(tempo / 2);
    }
    quiet = true;
}
- handleSpeaker: Receives high-level audio command and puts that command in the queue for speaker to receive music written in this function
void handleSpeaker(String state){
    if (state == "armed_alert"){
        numNotes = 15; // the number of notes
        notes = "ccggaagffeeddc"; // a space represents a rest
        int ourBeats[]= { 1, 1, 1, 1, 1, 1, 2, 1, 1, 1, 1, 1, 1, 2};
        tempo = 150;
        playSound(notes, ourBeats, tempo, numNotes);
    }

    if (state == "arm_toggle_alert"){
        numNotes = 5; // the number of notes
        notes = "bag"; // a space represents a rest
        int ourBeats[]= { 2, 2, 2, 1, 1, 1, 2, 1, 1, 1, 1, 1, 1, 2, 4 };
        tempo = 150;
        playSound(notes, ourBeats, tempo, numNotes);
    }

    if (state == "intruder_alert"){
        numNotes = 1; // the number of notes
        notes = "g"; // a space represents a rest
        int ourBeats[]= { 2, 2, 2, 1, 1, 1, 2, 1, 1, 1, 1, 1, 1, 2, 4 };
        tempo = 100;
        playSound(notes, ourBeats, tempo, numNotes);
    }
}
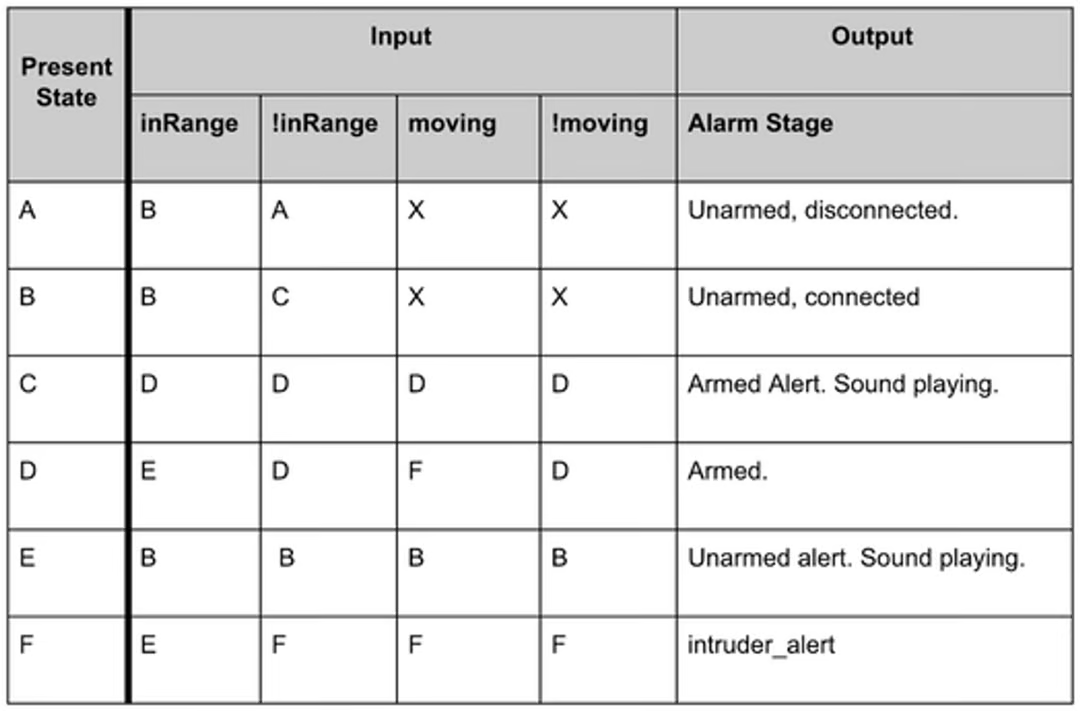
Controller Design
I chose to start off with Arduino Uno because it gives us sufficient memory and clock speed to not worry about resource constraints. I implemented the code as a finite state machine. I was able to get everything hooked up and get the FSM running before finishing the bluetooth module work. I simulated the input of the system with active low pushbuttons for lock and unlock. That's uninteresting and not elegant. Here is the final truth table:
Source code available for the FSM implementation coming soon on GitHub!
Demonstration here.